


Introduction
This post is the third in a series of three posts to understand how the MVC architecture works to create frontend applications. The objective is to comprehend the way to structure a frontend application by evolving a web page in which JavaScript is used as a scripting language towards an application in which JavaScript/TypeScript is used as an object-oriented language.
In this third post, the application will be built using Angular from the second version which used TypeScript. Therefore, this article is where the application will be migrated from TypeScript to Angular. However, it is very important to understand how all the parts of the application are related and how it is structured. Angular allows us to forget about DOM, so the user.view.ts file disappear from our app.
Finally, in the last article, we will transform our code to integrate it with the Angular framework.
Project Architecture
There is nothing more valuable than an image to understand what we are going to build, there is a GIF below in which the application we are building is illustrated.
This application can be built using a single JavaScript or TypeScript file which modifies the DOM of the document and performs all operations, but this is a strongly coupled code and is not what we intend to apply in this post.
What is the MVC architecture? MVC is an architecture with 3 layers / parts:
Models — Manage the data of an application. The models will be anemic (they will lack functionalities) since they will be referred to the services.
Views/Templates — The page/GUI where the user interacts with the app.
Controllers — Links between services and views.
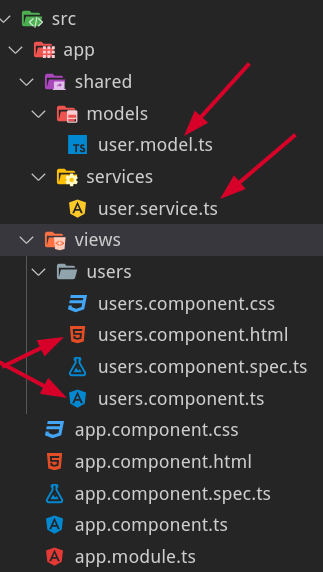
Below, we show the file structure that we will have in our problem domain:
The index.html file will act as a canvas on which the entire application will be dynamically built using the root element.
Finally, our file architecture is composed of the following TypeScript files:
user.model.ts — The attributes (the model) of a user.
user.service.ts — Manage all operations on users.
users.component.ts — The one in charge of joining the service and the view.
users.component.html — Responsible for refreshing and changing the display screen.
The App Module is the one shown below:
import { FormsModule, ReactiveFormsModule } from '@angular/forms';

import { AppComponent } from './app.component';
import { BrowserModule } from '@angular/platform-browser';
import { NgModule } from '@angular/core';
import { UserService } from './shared/services/user.service';
import { UsersComponent } from './views/users/users.component';

@NgModule({
  declarations: [AppComponent, UsersComponent],
  imports: [BrowserModule, FormsModule, ReactiveFormsModule],
  providers: [UserService],
  bootstrap: [AppComponent]
})
export class AppModule {}
You can see that our app use three modules: BrowserModule, FormsModule and reactiveFormsModule. The first module is used to get the basic structural and attributes directives from Angular, while that the second and third module are using to create our forms. In this example, the Users Module have not defined because this example is very tiny. You can see that UserService and UsersComponent are included in this module. In fact, you could split the UsersComponent into two components (List and Form) but in this example our goal is to show you the evolution from JavaScript to Angular.
Models (anemic)
The first built class in this example is the application model, user.model.ts, which consists of the class attributes, and a private method that is generating random IDs (these id's could come from a database in the server).
The models will have the following fields:
id. Unique value.
name. The name of the users.
age. The age of the users.
complete. Boolean that lets you know whether we can cross the user off the list.
The User class has been typed using TypeScript. However, the User constructor receives a plain object that will be provided from LocalStorage or from the user data input through the form. This plain object must comply with the UserDto interface in such a way that any plain object cannot be instantiated but those that satisfy the defined interface.
The user.model.ts is shown below:
export interface UserDto {
  name: string;
  age: string;
  complete: boolean;
}

export class User {
  public id: string;
  public name: string;
  public age: string;
  public complete: boolean;

  constructor(
    { name, age, complete }: UserDto = {
      name: null,
      age: null,
      complete: false
    }
  ) {
    this.id = this.uuidv4();
    this.name = name;
    this.age = age;
    this.complete = complete;
  }

  uuidv4(): string {
    return (([1e7] as any) + -1e3 + -4e3 + -8e3 + -1e11).replace(
      /[018]/g,
      (c: number) =>
        (
          c ^
          (crypto.getRandomValues(new Uint8Array(1))[0] & (15 >> (c / 4)))
        ).toString(16)
    );
  }
}
Services
The operations performed on users are carried out in the service. The service is what allows the models to be anemic, since all the logic load is in them. In this specific case, we will use an array to store all users and build the four methods associated with reading, modifying, creating and deleting (CRUD) users. You should note that the service makes use of the model, instantiating the objects that are extracted from LocalStorage to the User class. This is because LocalStorage only stores data and not prototypes of stored data. The same happens with the data that travels from the backend to the frontend, they do not have their classes instantiated.
The constructor of our class is as follows:
constructor() {
  const users: UserDto[] = JSON.parse(localStorage.getItem('users')) || [];
  this.users = users.map(user => new User(user));
}
Note that we have defined a class variable called users that stores all users once they have been transformed from a plain object ( UserDto) to a prototyped object of the User class.
The next thing we must define in the service will be each of the operations we want to develop. These operations are shown below using TypeScript:
 add(user: User) {
    this.users.push(new User(user));
    this._commit(this.users);
  }

  edit(userID: string, userToEdit: User) {
    this.users = this.users.map(user =>
      user.id === userID
        ? new User({
            ...user,
            ...userToEdit
          })
        : user
    );

    this._commit(this.users);
  }

  delete(userID: string) {
    this.users = this.users.filter(({ id }) => id !== userID);
    this._commit(this.users);
  }

  toggle(userID: string) {
    this.users = this.users.map(user =>
      user.id === userID
        ? new User({ ...user, complete: !user.complete })
        : user
    );

    this._commit(this.users);
  }
It remains to be defined the commit method that is responsible for storing the operation performed in our data store (in our case LocalStorage).
_commit(users: User[]) {
  localStorage.setItem('users', JSON.stringify(users));
}
This method doesn’t invokes a callback function that is binding when create the Service, as it was required when you're developing in JavaScript or TypeScript because Angular performs this task for you. I.e, Angular does the binding between controller and template.
The file user.service.ts is as follows:
import { User, UserDto } from "../models/user.model";

export class UserService {
  public users: User[];

  constructor() {
    const users: UserDto[] = JSON.parse(localStorage.getItem("users")) || [];
    this.users = users.map(user => new User(user));
  }

  _commit(users: User[]) {
    localStorage.setItem("users", JSON.stringify(users));
  }

  add(user: User) {
    this.users.push(new User(user));
    this._commit(this.users);
  }

  edit(userID: string, userToEdit: User) {
    this.users = this.users.map(user =>
      user.id === userID
        ? new User({
            ...user,
            ...userToEdit
          })
        : user
    );

    this._commit(this.users);
  }

  delete(userID: string) {
    this.users = this.users.filter(({ id }) => id !== userID);
    this._commit(this.users);
  }

  toggle(userID: string) {
    this.users = this.users.map(user =>
      user.id === userID
        ? new User({ ...user, complete: !user.complete })
        : user
    );

    this._commit(this.users);
  }
}
Views
This is the part that changes most compared to the previous posts in the series. In this case, we do not need to work with the DOM since Angular will perform the “hard” task of dynamically manipulating the DOM. However, we have to properly define the template.
The template (an Angular-enriched HTML version) that was created for this example is the one shown below.
<h1>Users</h1>

<form [formGroup]="userForm" (ngSubmit)="add(userForm.value)">
  <input
    type="text"
    placeholder="Name"
    name="name"
    formControlName="name"
  /><input
    type="text"
    placeholder="Age"
    name="age"
    formControlName="age"
  /><button>Submit</button>
</form>
<ul class="user-list">
  <li *ngFor="let user of users">
    <input type="checkbox" (change)="toggle(user)" [checked]="user.complete" />
    <span>
      <s *ngIf="user.complete; else uncompleteName">{{ user.name }}</s>
      <ng-template #uncompleteName>{{ user.name }}</ng-template>
    </span>
    <span
      #age
      contenteditable="true"
      class="editable"
      (focusout)="edit(user, age)"
    >
      <s *ngIf="user.complete; else uncompleteAge">{{ user.age }}</s>
      <ng-template #uncompleteAge>{{ user.age }}</ng-template></span
    >
    <button class="delete" (click)="delete(user)">Delete</button>
  </li>
</ul>
This example is not an Angular tutorial but it is a series of post in which you can see the evolution of a Web application from JavaScript -> TypeScript -> Angular. However, we note that much DOM manipulation code in previous posts has been resolved by Angular by providing two structural directives such as ngFor and ngIf that allow the DOM to be manipulated comfortably from the template itself.
Another interesting point that Angular has helped us in this example is the use of reactive Forms, since we have connected the template with the controller without having to make connections between both parties by sending a handler to perform the tasks.
Controllers
The last file of this architecture is the controller ( users.component.ts). The controller receives the two dependencies it has (service and formBuilder) by dependency injection (DI). Those dependencies are stored in the controller in private variables.
The controller only focuses on managing the attributes that are connected to the view (template) and invoking the service. Exactly like our first JavaScript code or second TypeScript version of the previous posts. In this case, we have left the framework all the tasks associated with the DOM.
The file users.component.ts is the one shown below:
import { Component, OnInit } from '@angular/core';

import { FormBuilder } from '@angular/forms';
import { UserService } from 'src/app/shared/services/user.service';

@Component({
  selector: 'app-users',
  templateUrl: './users.component.html',
  styleUrls: ['./users.component.css']
})
export class UsersComponent implements OnInit {
  public users;
  public userForm;

  constructor(
    private userService: UserService,
    private formBuilder: FormBuilder
  ) {
    this.userForm = this.formBuilder.group({
      name: '',
      age: ''
    });
  }

  ngOnInit() {
    this.refreshUsers();
  }
  refreshUsers() {
    this.users = this.userService.users;
  }

  add(userForm) {
    this.userService.add(userForm);
    this.refreshUsers();
    this.userForm.reset();
  }
  delete({ id }) {
    this.userService.delete(id);
    this.refreshUsers();
  }
  edit(user, { innerText: age }) {
    const { id } = user;
    this.userService.edit(id, { ...user, age });
    this.refreshUsers();
  }
  toggle({ id }) {
    this.userService.toggle(id);
    this.refreshUsers();
  }
}
Conclusions
In this third post, we have developed a Web application in which the project has been structured following the MVC architecture in which anemic models are used and the responsibility for the logic lies on the services.
It is very important to highlight that the didactical of this post is to understand the structuring of the project in different files with different responsibilities and how the view is totally independent of the model/service and the controller.
It is also important to note that in this post, we have migrated the application from TypeScript to Angular, allowing us to forget about repetitive tasks related to the DOM that are exactly the same in all the Web applications that we develop.
My recommendation is that you start from the first post related to JavaScript and understand the architecture used. The next step is to reinforce the code by applying TypeScript (in the second post) and finally review this post in which the code has been adapted to a framework.
Of course, this is not an Angular tutorial but about the evolution of our code from a technology to a framework.
The GitHub branch of this post is https://github.com/Caballerog/Angular-MVC-Users
Originally published at https://www.carloscaballero.io on November 12, 2019.